If you work in digital marketing, then I’m sure you already know about triggered emails and how they are helping companies like Amazon.com dramatically increase ROI from email marketing.
But did you know you can also create triggered Facebook ad campaigns?
Triggered marketing automation is the future of marketing. And triggered Facebook ads let you deliver the right marketing message to the right person at the right time based on specific actions (or triggers) that the person took on your website.
Triggered emails and ad campaigns, have proven to have much higher click through rates and conversion rates because they are designed to deliver a more timely and relevant message than regular ad campaigns or email newsletters.
Here are just a few examples of how triggered ads can be applied…
- SaaS companies can use triggered ads to improve onboarding of trial users based on actions the user took inside the app.
- Ecommerce sites can use triggered Facebook ads to target ads at people who have viewed specific product pages or who have abandoned their shopping carts.
The example below will walk you through set up of a basic Facebook triggered ad campaign for an Ecommerce Company.
1) Place Facebook retargeting pixel on all pages of your website
To find your retargeting code, click on “Manage Ads” in your Power Editor, then click “Audiences”. Once you are in the Audiences screen, click on “Create Audience” and select “Custom Audience”.
You should now see a screen that looks like this.
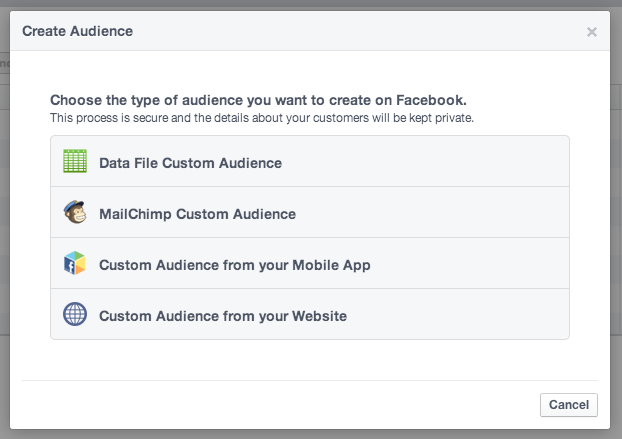
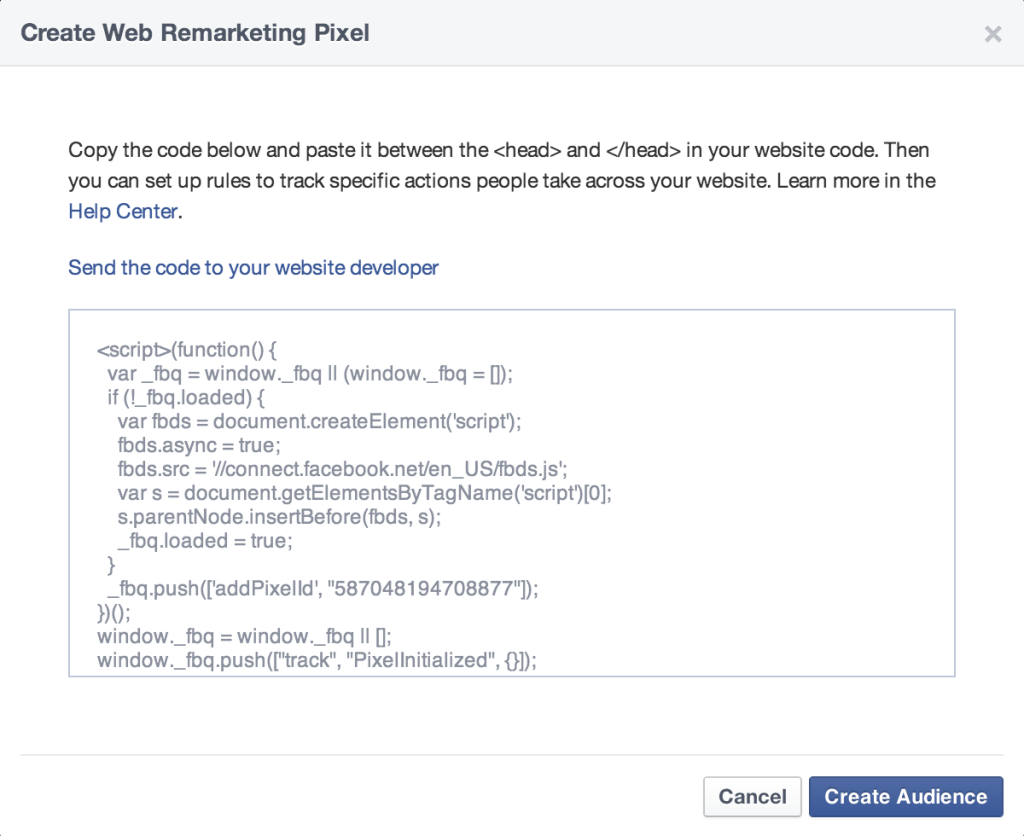
Click on “Custom Audience from your Website” and you will see a screen that looks like this. Copy the script and place it in every page of your website before the closing </head> tag in your HTML.
2) Create Custom Audiences for each of your Triggers
Once you’ve got your script placed on all the pages of your site, it’s time to create a unique custom audience for each of your trigger events. Trigger events, are basically, the actions that visitors take on your site that causes a new ad campaign to initiate and display for that particular visitor.
To keep this example simple, let’s say that you own an Ecommerce website. You might want to have different ad campaigns for the following groups of people:
- People who visit your homepage but not a product page
- People who view a product page
- People who made it to your checkout page but don’t complete their purchase
We are going to create unique custom audiences for each of these visitor segments.
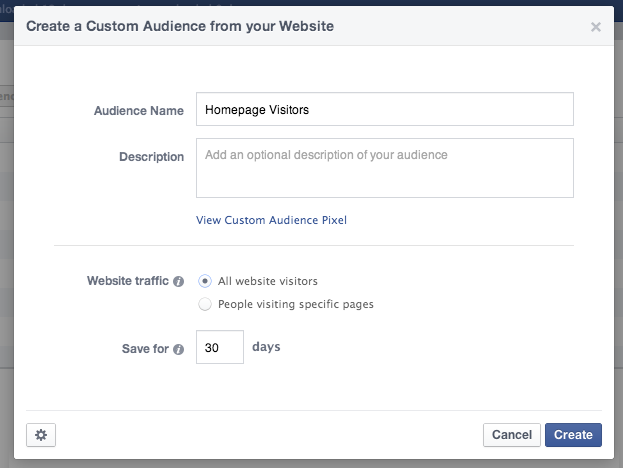
To set up the first retargeting audience, let’s go back to the Create Audience screen that we visited previous and click on “Custom Audience from your Website” again. This time, we are going to create a list call “Homepage Visitors”. For this audience, we can make it easy by selecting “All Website Visitors” and choose a time duration that works for the timing of your sales cycle.
Next, you’ll want to create a custom audience for people who viewed your product page. In this case, you can generate an audience for each specific product, each product category, or use a single audience to includes all product pages. It depends on how many products you have in your store and how much time you want to dedicate toward setting up ads for each specific product.
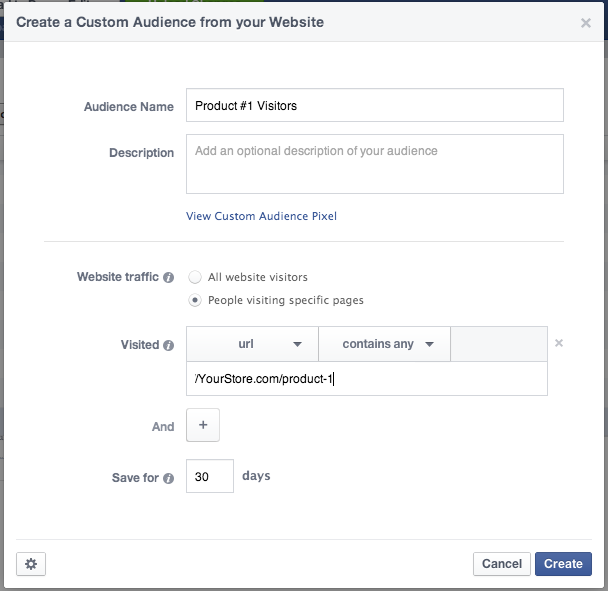
Finally, you’ll want to create a third audience for people who visited your checkout page and your product page but who didn’t complete a purchase (these are the people who have already abandoned your shopping cart and are the most likely to return to your site to buy your products).
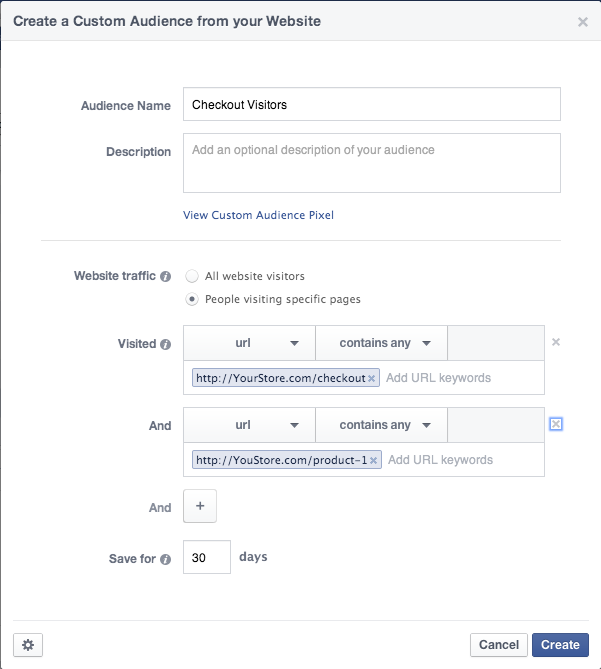
Now that we’ve created our custom audiences for each of our trigger activities, we’ve got one more small (but important) step before we can to set up your Facebook ad campaigns…
3) Create “Excluded Audiences”
Make sure to create one last custom audience of people who successfully completed purchases from your sites. We’re going to exclude this audience from your campaigns. You don’t want to bother your happy customers by promoting products to them that they’ve already purchased from you.
To set up this up, just create another custom audience like we did in step 2 above that includes only your order confirmation page.
4) Set up your ad campaigns
OK, now that we’ve got your trigger audiences set up, it’s time to set up your ad campaigns.
For the purposes of this article, I’m just going to focus on the audience parameters and leave the ad creatives and bidding options for another post.
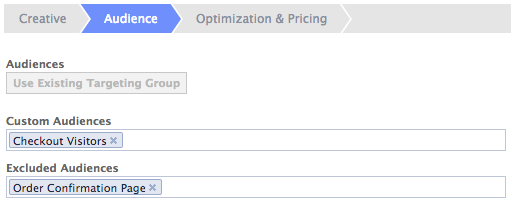
For your first triggered Facebook campaign, we want to target people who visited your site but didn’t visit your product page. To do that, we will target your “Homepage Visitors” audience and exclude all visitors who visited your product page, checkout page or who completed a purchase.
This will probably become your largest audience (and the least likely to convert), so manage your budget accordingly.
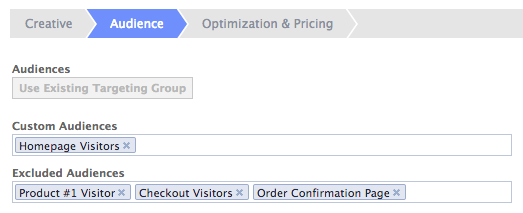
For your next ad campaign, we’ll target people who visited your product page but who did not get to your checkout page.
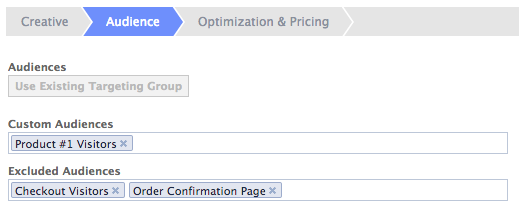
And finally, for the last campaign, we will be targeting people who made it all the way to your checkout page but abandoned your site before they completed a purchase. Here’s what the set up looks like…
Marketing Automation with Awesome ROI
A triggered Facebook ad campaign like this is an example of simple marketing automation at it’s finest. If you set the time durations of your customer audiences to a reasonable time limit (probably 14-30 days), then you should be able to leave these ads running for a long time without needing to do much campaign management.
Most small or medium size websites should be able to run these campaigns for under $5 per day. And the ROI of should be fantastic because your ads are only being displayed to people who have already shown interest in and intent to buy your products.
Now it’s your turn…
If you’ve got any questions about how to set up triggered Facebook campaigns or about how this strategy can be applied to your business, then please ask your questions in the comments and I’ll do my best to clarify.
If you liked this strategy and you want to learn more creative (and profitable) tactics for Facebook ads, then please leave a comment below so I know that you’re getting value. It makes me happy to know people appreciate my articles and your comments encourage me to write more.
And, of course, the best way to stay up to date with all my latest Facebook Ads strategies is to sign up for my email list.

Great article! Thank you. I don’t think I could use this technique with Wix.com websites though. They prevent people from editing the HTML on websites.
Hey Derek, I’ve never used Wix before but I just did a quick search and I’ll bet that you can add the Facebook code with this http://www.wix.com/support/main/html5/wix-app-market/apps-made-wix/html#
Hope it helps.
You can add the code to your HTML with WebStarts.com. It’s an alternative website builder to Wix.
Great info, thanks for the ideas!
Hey Aaron – thanks for this walkthru, very useful. I’m starting a SaaS company myself, and we’ll be experimenting with some paid advertising in the next month or two.
Hey Aaron,
Loved this. Sent this off to my business partner and posted on FB about it. Really simple and duplicatable and gave me about a dozen ideas 🙂
Thanks man!
Will def be following your blog 🙂
Hey Brad,
I’m glad you liked the article.
If you test any of these strategies, please come back and tell me how they worked for you. I love hearing about about my ideas help people.
Cheers,
Aaron
Hello Aaron,
It looks like its been a while since someone posted here, but I wanted to say thanks for the site, love the thinking.
Is there a way to trigger an ad based on local temperature? (You can laugh but don’t point.) I wanted to help a local pho place ads in a small town when it gets below a certain temperature.
Thanks!
Hey Jeremy,
Unfortunately, I don’t think there is currently a way to target people based on weather.
Hi Aaron, thanks for your article !
For jeremy, a bit late , but it’s possible with this kind of tool here : http://www.weatherads.io/pricing .
Great day
Wow, I loved this. Very insightful information. You explained everything so well. I can imagine the hard work you did for this article. Keep it up 🙂